Welcome to our comprehensive guide on how to build steps for a deck in Australia! Whether you’re looking to improve the functionality of your outdoor space or simply enhance its overall appearance, building deck steps is a practical DIY project that adds both value and convenience to your home. In this article, we’ll walk you through the entire process, from understanding Australian building codes to selecting the right materials and constructing safe, sturdy steps. With easy-to-follow instructions, useful tips, and expert advice, this guide is designed to help you create deck stairs that are not only functional but also compliant with local regulations. Let’s get started on transforming your outdoor space.
To build steps for a deck in Australia, start by measuring the height of the deck to determine the number of steps needed, ensuring each step’s rise and tread comply with Australian building codes. Cut stringers to support the steps, attach them to the deck frame, and install treads and risers. Use weather-resistant timber and follow safety guidelines, such as adding non-slip treads and railings if necessary. Regular maintenance, like sealing the wood and checking for rot, ensures long-term durability in Australia’s climate.
- Planning And Preparing To Build Your Deck Steps
- Measuring And Designing The Steps
- Step-By-Step Guide To Building Deck Steps
- Ensuring Safety And Durability For Deck Steps
- Common Mistakes To Avoid When Building Outdoor Steps
- Alternatives And Enhancements For Deck Steps
- FAQs: About How To Build Steps For A Deck Australia
- Conclusion
Planning And Preparing To Build Your Deck Steps
Building deck steps in Australia requires a solid plan and understanding of key regulations, materials, and tools to ensure the project’s success. Whether you’re a seasoned DIY enthusiast or a first-time builder, careful preparation is essential for both safety and durability. Here’s a step-by-step guide to help you get started.
Understanding Australian Building Codes
When planning to build deck steps, it’s crucial to adhere to Australian building codes and standards. The Australian Building Codes Board (ABCB) provides guidelines to ensure safety, functionality, and compliance. Deck steps must meet specific requirements related to height, depth, and structural integrity to ensure safety for users.
Key Points to Consider
- Step Height and Depth: The riser height (vertical part of the step) should generally not exceed 190mm, while the tread depth (horizontal part) should be at least 240mm. This ensures that steps are comfortable and safe to use.
- Handrails: Depending on the height of your deck, Australian codes may require handrails for safety. Typically, any deck higher than 1 meter from the ground needs a handrail.
- Slip Resistance: Deck steps should feature slip-resistant surfaces, especially in areas prone to rain or moisture.
- Load-bearing Capacity: Make sure your deck and steps can support the required weight as outlined by the standards.
For detailed guidelines and regional variances, consult local resources like the ABCB website or speak with your local council to ensure compliance.
Choosing the Right Materials
Selecting the right materials is key to ensuring the longevity and safety of your deck steps. In Australia, timber is a popular choice due to its natural appeal and availability. However, there are several options to consider based on your climate and durability needs.
Commonly Used Timber Materials
- Treated Pine: Affordable and readily available, treated pine is resistant to termites and rot, making it an excellent choice for outdoor use in most Australian climates. It’s treated with chemicals to enhance its durability against the elements.
- Hardwood: If you’re after a more premium look, hardwoods like Merbau or Spotted Gum are fantastic choices. These types of timber are naturally durable and resistant to weathering, though they are typically more expensive than treated pine.
Alternative Materials
- Composite Materials: Composite decking is a mix of wood fibers and plastic, offering superior durability and minimal maintenance. It’s a great option if you’re looking for a long-term solution without the need for regular staining or sealing.
- Concrete: For steps that need extra durability or are part of a modern design aesthetic, concrete steps may be a practical and attractive alternative. Concrete is highly durable and can be customized with various finishes to suit your outdoor space.
Climate Considerations
Depending on where you live in Australia, your choice of material may vary.
- Tropical regions: Opt for highly resistant hardwood or composite materials that can withstand moisture and termites.
- Dry, arid areas: Treated pine and hardwoods will perform well with proper maintenance.
Tools You’ll Need
Before diving into construction, ensure you have the right tools to complete the job efficiently and safely. Here’s a checklist of essential tools for building your deck steps.
- Saw: A circular saw or handsaw will help you cut your materials to the correct size.
- Level: Ensuring your steps are level is crucial to both safety and appearance.
- Tape Measure: Accurate measurements are the foundation of a successful project.
- Framing Square: This will help ensure your steps have perfect 90-degree angles, making for a solid and attractive build.
- Drill: You’ll need a power drill for securing your steps with screws and bolts.
- Hammer: A hammer is essential for nailing and fitting timber pieces together.
Additionally, it’s a good idea to have a speed square, pencil, and string line handy for marking and ensuring straight lines during the construction process.
Safety First
Safety should always be a priority when working on any construction project, especially when building deck steps. Here’s a quick reminder of the essential safety gear you’ll need.
- Gloves: Protect your hands from splinters, nails, and other sharp objects.
- Goggles: Eye protection is critical when cutting timber or drilling to prevent debris from causing injury.
- Proper Footwear: Ensure you wear sturdy, closed-toe shoes or boots to protect your feet from falling tools or materials.
- Hearing Protection: If you’re using power tools, it’s wise to wear earmuffs or earplugs to safeguard your hearing.
- First Aid Kit: Always keep a first aid kit nearby in case of minor accidents.
By keeping safety at the forefront and following these planning steps, you’ll be well-prepared to tackle your deck step project with confidence.
Planning and preparing for building your deck steps is an exciting yet detailed process. From adhering to Australian building codes to choosing the right materials and ensuring you have the right tools, every aspect plays a vital role in creating a safe, sturdy, and visually appealing structure. Remember to always prioritize safety and consult local resources to stay compliant with regulations. With careful planning, your deck steps will become a functional and beautiful addition to your outdoor living space.

Measuring And Designing The Steps
When it comes to building stairs for your deck, understanding the proper measurements and design considerations is crucial to ensuring both functionality and aesthetic appeal. This section will guide you through the process of calculating the rise and run, complying with Australian step standards, working with stair stringers, and factoring in essential design elements for a safe and stylish staircase.
Calculating the Rise and Run
One of the first steps in designing a staircase is understanding the terms rise and run. The rise refers to the vertical height that each step will cover, while the run refers to the horizontal depth or length of each step. Properly calculating these measurements is essential to ensure comfort and safety.
To determine the number of steps needed for your staircase, you will need to measure the total height (or rise) from the ground to the top of the deck. Let’s say, for example, your deck is 1.2 meters high. Using the formula below, you can calculate the number of steps required.
- Measure the total height (vertical rise) of the deck.
- Divide this height by the ideal individual step rise. In Australia, the recommended step rise is between 150mm and 180mm (15cm to 18cm).
- If your deck is 1.2 meters (1200mm) high and you aim for a step rise of 170mm.
The run of the stairs (the horizontal distance) will depend on the tread depth you choose, which is covered in more detail below. An average tread depth is around 250mm, allowing for comfortable walking space.
Complying with Australian Step Standards
Australia has specific regulations regarding stair dimensions to ensure safety and comfort for users. These standards are important to follow closely when designing your deck stairs.
- Step Rise: As mentioned earlier, the ideal rise for each step should be between 150mm and 180mm. Anything higher can make the stairs uncomfortable and potentially dangerous to climb.
- Tread Depth: The horizontal part of each step, known as the tread, should typically be at least 240mm. This gives ample room for foot placement and provides stability.
- Stair Width: While there isn’t a strict legal requirement for stair width in Australia, it is recommended that stairs be at least 900mm wide to allow easy passage. This width is especially important if your stairs will serve as the primary entrance to your deck.
Following these standards will not only ensure the safety of those using the stairs but also help in meeting building code requirements.
Stair Stringers
Stair stringers are an essential part of your stair design as they provide structural support for the steps. They run along the sides of the staircase and hold each step in place. It’s crucial to properly measure and cut your stringers to ensure the entire staircase is level and secure. Here’s a quick guide to measuring and cutting your stringers.
- Measure the total rise: This is the height from the ground to the top of your deck.
- Divide by the number of steps: As calculated earlier, divide the total rise by the number of steps to get the rise per step.
- Mark and cut the stringer: Using a framing square, mark the rise and run for each step along a piece of timber that will serve as the stringer. Make sure the cuts are precise, as uneven steps can lead to safety issues or discomfort when using the stairs.
You will typically need at least two stringers for your staircase one on each side of the steps. For wider stairs, consider adding a third or even fourth stringer for additional support.
Design Considerations
Once the technical aspects of your staircase are in place, it’s time to think about design. A well-designed staircase can enhance the look of your deck and blend seamlessly with the overall aesthetic of your home.
- Railing Options: Safety is paramount when it comes to stairs, and adding railings is often required by building codes. Consider railings that match the material and style of your deck, whether that’s wood, metal, or glass.
- Width of the Stairs: While 900mm is the recommended minimum width, you can increase the width of your stairs for a grander, more inviting look. Wider stairs can also provide more room for foot traffic, especially for larger gatherings.
- Landing Areas: If your deck is particularly high, or if space allows, consider incorporating a landing area halfway up the staircase. This not only adds a design feature but also makes longer staircases more manageable for users.
By carefully considering these design elements, you can create stairs that are not only functional and safe but also a beautiful addition to your outdoor space.
Designing and building deck stairs involves a balance between adhering to safety standards and creating a visually pleasing structure. By carefully calculating the rise and run, complying with Australian standards, correctly cutting your stair stringers, and thoughtfully designing the aesthetic aspects of the stairs, you can ensure that your deck stairs are both practical and attractive.

Step-By-Step Guide To Building Deck Steps
Building deck steps is a crucial aspect of any outdoor project. Whether you’re renovating or installing a new deck, having sturdy and well-constructed steps ensures both functionality and safety. Follow this step-by-step guide to building deck steps and achieve professional results.
Mark and Measure the Layout
The first step in building deck steps is to mark and measure the area where the steps will be installed. Start by determining the exact location of the steps, ensuring they are aligned with the deck entry point. Use stakes or chalk lines to outline the stair’s placement.
One critical aspect to ensure is that the stringers (the sloped boards that support each step) are evenly spaced. Typically, stringers are spaced about 12 to 16 inches apart, depending on the width of your steps and the thickness of your tread material. Measuring carefully at this stage will help you avoid any alignment issues later on. To ensure proper placement.
- Use a level and a straightedge to mark both horizontal and vertical lines where the stringers will be attached.
- Measure the rise (height) and run (depth) of each step carefully. A standard rise is around 7 to 7.5 inches, while the run can vary between 10 and 12 inches.
- Double-check your measurements to confirm that the stairs will fit into the designated area seamlessly and provide comfortable step spacing.
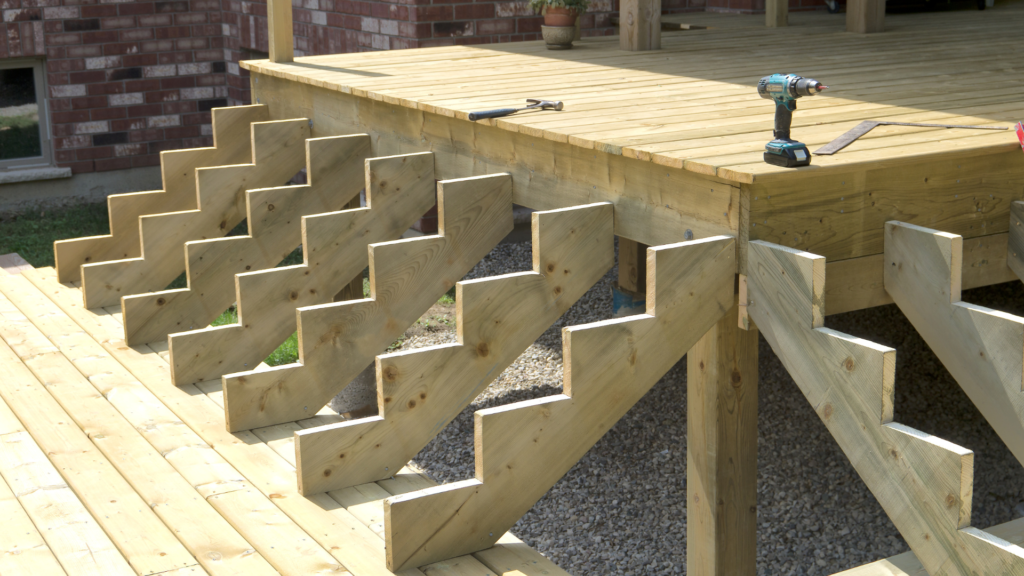
Cutting the Stringers
Once the layout is marked, the next step is cutting the stringers. A framing square will be your best tool for marking and cutting stringers accurately. Here’s how.
- Lay the framing square on the stringer board and mark the rise and run dimensions on the wood. You’ll typically start by measuring the first rise and run at the top of the board.
- Continue marking down the length of the board for each step, ensuring all cuts are identical.
- Once the layout is marked, use a circular saw to make the cuts. Make sure to cut just outside the marked lines to maintain the integrity of your measurements.
- After cutting with the circular saw, finish any tight corners with a handsaw for precision.
Before cutting all your stringers, cut and test the first one to ensure it fits perfectly. Once confirmed, use this as a template to mark the remaining stringers, ensuring consistency.
Attaching the Stringers
With your stringers cut, it’s time to attach them to the deck frame. This step requires precision and the right hardware to ensure the stairs are securely fastened.
- Position the stringers at the marked locations on the deck. The top of each stringer should sit flush with the deck frame or ledger board, where they will be attached.
- Use heavy-duty screws or deck brackets to secure the top of the stringers to the deck. Always use corrosion-resistant fasteners, such as galvanized or stainless-steel screws, to ensure durability, especially in outdoor conditions.
- For additional support, you may want to install a concrete pad or footing beneath the base of the stringers, securing them further to the ground. This is particularly important if your steps are high or if they’ll see a lot of foot traffic.
Installing the Treads and Risers
Once the stringers are attached, it’s time to install the treads and risers. The treads are the horizontal part of each step, while the risers are the vertical portions between each step.
- Cutting the treads and risers: Measure the length needed for both treads and risers, ensuring each piece fits snugly across the width of your stringers. The treads should be at least 10 inches deep for a comfortable step, and the risers should be around 7 inches high.
- Attaching the treads: Begin by securing the treads to the stringers using screws or nails. Start from the back and work your way forward, making sure each tread is level and sits securely. If using wood, leave a small gap (around 1/8 inch) between each tread to allow for wood expansion and drainage.
- Attaching the risers: Fasten the risers to the vertical section between the treads. These will help reinforce the structure and create a polished, finished look.
Ensure each tread is level as you install it. Uneven steps can lead to safety issues and make the stairs uncomfortable to use.
Finishing Touches
Now that the basic structure of your deck steps is complete, it’s time to focus on the finishing touches to enhance both appearance and safety.
- Sanding down rough edges: Sand any rough edges on the treads and risers to avoid splinters or injuries. Pay special attention to the corners and edges of the steps.
- Adding non-slip features: For added safety, especially in wet or icy conditions, consider applying non-slip treads or a slip-resistant coating to each step. This is particularly useful if the deck is in a high-traffic area or prone to moisture.
- Applying weatherproofing treatments: Protect your new deck steps from the elements by applying a weatherproofing treatment, such as a sealant or stain. For Australian climates, where extreme weather can be a concern, it’s essential to use a product designed to protect against UV rays, rain, and humidity. A high-quality outdoor stain or sealant will extend the life of your deck steps and maintain their appearance.
By following this step-by-step guide, you can build durable and attractive deck steps that will not only enhance the functionality of your outdoor space but also ensure safety and longevity for years to come. Whether you’re an experienced builder or a DIY enthusiast, these detailed instructions will help you complete the project with professional results.

Ensuring Safety And Durability For Deck Steps
When constructing or upgrading your deck, safety and durability are critical factors that should never be overlooked. Proper attention to safety measures ensures not only a secure environment for you and your loved ones but also extends the life of your deck. Let’s break down how you can enhance the safety and durability of your deck steps, following Australian standards and practical tips.
Adding Railings for Safety
One of the most important safety features for any deck, particularly those with steps, is the installation of handrails. According to Australian building codes, if your deck or staircase is over 1 meter (1000mm) in height, installing handrails becomes mandatory. This rule helps prevent accidents such as falls, particularly in homes with children, elderly residents, or guests who may be less steady on their feet.
In addition to meeting the legal requirements, handrails provide much-needed support and peace of mind when navigating steps. Even for lower decks, adding handrails can be a wise decision, especially if the stairs are wide or if the deck is frequently used at night, when visibility is lower.
For the best results, choose materials that complement your deck’s overall design. Popular options include wood, metal, or even glass, all of which can be treated to withstand the harsh Australian climate. Make sure that the handrails are sturdy, well-anchored, and comply with Australian safety regulations for both height and spacing.
Using Non-Slip Materials
Australian weather conditions, particularly in coastal areas or regions that experience heavy rain, can make deck steps slippery and dangerous. To minimize the risk of slips and falls, it’s crucial to consider non-slip materials or treatments for your deck steps.
Non-slip treads are a simple and effective solution. These are available in various designs and can be added to your existing steps without needing a full overhaul. Alternatively, you can opt for decking boards that are manufactured with a non-slip surface, ideal for areas that experience consistent rain or humidity.
Another excellent way to enhance grip on your deck steps is to apply non-slip coatings or sealants. These treatments create a textured surface, reducing the chances of accidents even when the deck is wet. Look for options specifically designed for outdoor use and suitable for wood, composite, or concrete steps, as this will ensure long-lasting protection in Australia’s diverse climates.
Regular Maintenance for Longevity
To keep your deck steps in top condition, regular maintenance is essential. Australian weather, with its intense sun, occasional frost, and seasonal rain, can take a toll on your deck materials, causing them to degrade over time. Here are some maintenance tips to ensure your deck steps remain safe and durable for years.
- Cleaning: Dirt, leaves, and moisture can accumulate on your deck steps, leading to potential hazards like moss or mildew, which can make the surface slippery. Regularly sweeping and washing your deck will prevent these issues from building up. Using a pressure washer on low settings can help clean stubborn dirt, but avoid using too much pressure, which can damage wood surfaces.
- Checking for Wood Rot: Particularly for wooden decks, regularly inspecting for signs of wood rot is crucial. Australia’s humid and wet regions are especially prone to wood decay, which can weaken the structure of your steps. Soft spots, discolored wood, or areas that seem to absorb moisture more than others are indicators of rot. Addressing these problems early will prevent more costly repairs down the line.
- Reapplying Sealant: To prolong the lifespan of your deck steps, it’s important to reapply a protective sealant every few years, especially if your deck is exposed to the elements. A good-quality sealant will protect the wood from moisture, UV rays, and temperature fluctuations, all of which can cause warping, cracking, or fading. Make sure the sealant you choose is suitable for your decking material and the climate in your region.
Ensuring the safety and durability of your deck steps involves a combination of meeting Australian building code requirements, using the right materials, and maintaining your deck regularly. By installing handrails, choosing non-slip solutions, and performing regular upkeep, you’ll create a safe, long-lasting deck that you can enjoy for years to come.

Common Mistakes To Avoid When Building Outdoor Steps
Building outdoor steps may seem like a straightforward task, but there are several common mistakes that, if overlooked, can lead to serious problems. To ensure a long-lasting, safe, and compliant structure, it’s important to be aware of potential pitfalls during the planning, building, and maintenance phases. Below are some key mistakes to avoid.
Incorrect Measurements
One of the most frequent errors in step construction is inaccurate measurements. Even minor miscalculations can result in uneven steps, which not only look unprofessional but can also be dangerous. Uneven steps can create a tripping hazard, especially when they are outdoors and exposed to changing weather conditions.
Always take time to measure each step’s rise (vertical height) and run (horizontal depth) carefully, ensuring they are consistent. Poor measurements could also affect the slope, leading to water pooling or causing the steps to sink over time. It’s essential to double-check measurements before cutting materials or pouring concrete, as correcting mistakes after construction can be costly and time-consuming.
Using the Wrong Materials
Another common mistake is using the wrong materials for outdoor steps. Not all building materials are suited for outdoor use, especially in Australia, where weather conditions can range from extreme heat to heavy rains and humidity. Opting for non-weather-resistant materials, like untreated timber, can lead to premature rotting, warping, or degradation.
Instead, choose materials that are specifically designed to withstand outdoor elements. For example, treated timber, composite decking, or durable natural stone are great choices for Australian weather conditions. Investing in high-quality, durable materials ensures that your steps will remain safe, sturdy, and aesthetically pleasing for years to come.
Ignoring Building Codes
Ignoring local building codes is a serious mistake that can lead to significant consequences. In Australia, there are strict regulations in place to ensure the safety and structural integrity of outdoor steps. Failing to comply with these codes could result in fines, penalties, or even the need to demolish and rebuild the entire structure.
Building codes often dictate the minimum width of steps, the height of risers, and the need for handrails. It’s crucial to familiarize yourself with these requirements before starting construction to avoid costly errors. Hiring a professional builder or consulting with your local council can help ensure that your project meets all necessary legal and safety standards.
Skipping Maintenance
After building your steps, the work doesn’t stop there. Many homeowners overlook the importance of regular maintenance, which can lead to long-term structural issues. Outdoor steps are constantly exposed to the elements, so routine inspections and upkeep are essential to ensure their longevity.
Look for signs of wear, such as cracks in concrete, loose boards, or signs of rot in timber. Addressing these issues early on can prevent more extensive damage and help you avoid costly repairs in the future. In addition, cleaning the steps regularly and reapplying protective coatings or sealants can extend their lifespan and keep them looking their best.
By avoiding these common mistakes, incorrect measurements, using the wrong materials, ignoring building codes, and skipping maintenance you can ensure your outdoor steps are safe, durable, and built to last in the challenging Australian climate. Always take the time to plan properly and consult professionals when necessary to achieve the best results.

Alternatives And Enhancements For Deck Steps
When planning your deck, thinking beyond basic functionality can elevate both the style and usability of your outdoor space. Here are some alternatives and enhancements that can enhance your deck steps, providing both practical and aesthetic benefits.
Pre-Fabricated Step Kits
For those looking for a quicker and easier solution to building deck steps, pre-fabricated step kits are a popular alternative. These kits come ready-made, with all the necessary parts cut to size and prepared for assembly. They are designed to save time and effort while ensuring consistent quality and measurements.
Pros of Pre-Fabricated Step Kits.
- Ease of Installation: The biggest advantage of using a pre-fabricated kit is the simplicity of assembly. These kits often come with detailed instructions, making them ideal for DIY enthusiasts or those without extensive construction experience.
- Time Efficiency: With everything pre-measured and pre-cut, you can save hours if not days—on construction time. This allows you to enjoy your new deck steps sooner.
- Consistency: Because these kits are machine-cut, there is a level of precision that can be difficult to achieve with custom-built steps. This ensures a uniform, professional-looking result.
Cons of Pre-Fabricated Step Kits.
- Limited Customization: Pre-made kits may not offer the same level of design flexibility as building your own steps from scratch. You’re generally restricted to the sizes and styles available from the manufacturer.
- Higher Initial Cost: While these kits save time, they may come with a higher price tag compared to sourcing your own materials. The convenience factor often adds to the cost.
- Fit Limitations: If your deck is a custom design or has unusual dimensions, pre-fabricated kits might not fit perfectly without additional modifications.
Incorporating Lighting
Adding lighting to your deck steps can significantly improve both the safety and ambiance of your outdoor space. Illuminated steps reduce the risk of trips and falls, particularly in low-light conditions. Lighting can also enhance the visual appeal of your deck, creating a warm and inviting atmosphere during evening gatherings.
- Solar Lights: One of the easiest and most eco-friendly ways to add lighting to your deck steps is with solar-powered lights. These require no wiring, making them a cost-effective solution for homeowners who want to avoid the hassle of electrical work. Solar lights charge during the day and automatically turn on at dusk, providing low-maintenance, energy-efficient illumination.
- LED Strip Lights: For a sleek, modern look, consider installing LED strip lights along the edges or undersides of your steps. These can be tucked away discreetly, providing a soft glow that highlights the stairs without overpowering the overall design.
- Recessed Step Lights: For a more permanent and professional appearance, recessed step lights can be installed directly into the risers or side walls of your steps. While they require more effort and expertise to install, recessed lights provide a seamless, elegant finish.
Advanced Features
If you’re looking to make your deck steps stand out, consider adding some advanced design features that can enhance both form and function.
- Built-In Planters: Incorporating built-in planters on either side of your deck steps can add a touch of nature and color to the area. Planters can serve as a visual border while also making your steps more inviting. Choose plants that thrive in your climate, or use seasonal blooms to refresh the look throughout the year.
- Storage Solutions: If you’re short on storage space, consider utilizing the area beneath your deck steps for built-in storage. Hidden compartments or cabinets can be installed under the stairs, providing a discreet place to store gardening tools, outdoor cushions, or even seasonal décor. This not only maximizes space but also helps keep your deck area neat and organized.
- Decorative Railings: Another enhancement to consider is adding decorative railings to your deck steps. Railings can improve safety while offering an opportunity to inject style and personality into your design. Options range from classic wood to modern metal or even glass, depending on the aesthetic you’re aiming for.
Incorporating these alternatives and enhancements into your deck step design can help you create a more functional, stylish, and unique outdoor space. Whether you’re opting for the convenience of pre-fabricated step kits, adding lighting for safety, or customizing with advanced features like planters and storage, these upgrades ensure that your deck is both practical and visually appealing.

FAQs: About How To Build Steps For A Deck Australia
Conclusion
Building safe and functional deck steps requires careful planning, attention to detail, and a commitment to following proper guidelines. We’ve covered the essential steps, from measuring the rise and run to selecting the right materials and ensuring your design complies with local building codes. Whether you’re a seasoned DIY enthusiast or tackling your first outdoor project, building deck steps is a manageable task that can significantly enhance the functionality and appeal of your outdoor space. By following this guide, you’ll create sturdy, long-lasting steps that not only look great but also provide safety for years to come. So, take on this project with confidence, knowing that with careful measurements, quality materials, and attention to safety, you’ll have deck steps you can be proud of. If you found this guide helpful, don’t hesitate to share it with friends or family who are also looking to enhance their outdoor spaces, and feel free to leave a comment with any tips or experiences you’d like to share with the community.
About the Author:
Mike Veail is a recognized digital marketing expert with over 6 years of experience in helping tradespeople and small businesses thrive online. A former quantity surveyor, Mike combines deep industry knowledge with hands-on expertise in SEO and Google Ads. His marketing strategies are tailored to the specific needs of the trades sector, helping businesses increase visibility and generate more leads through proven, ethical methods.
Mike has successfully partnered with numerous companies, establishing a track record of delivering measurable results. His work has been featured across various platforms that showcase his expertise in lead generation and online marketing for the trades sector.
Learn more about Mike's experience and services at https://theleadguy.online or follow him on social media: